
Create Hyper-V VDI/VM by name from CSV file
I was working on a Hyper-V VDI project for a customer recently, who needed to easily deploy a VDI Template VHD from a CSV file and create VMs based on this VHD. I put this script together to fit this requirement.
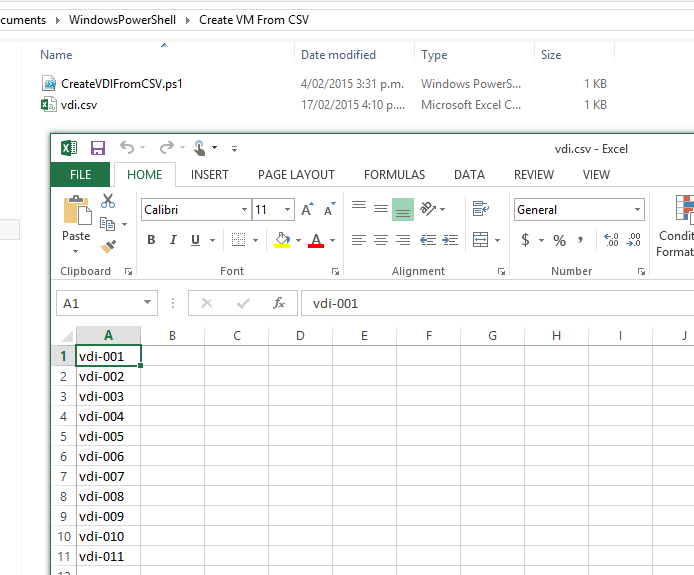
It references a CSV file called vdi.csv, which contains your desired Hyper-V VM names. It then builds as many copies of the VM as your CSV contains:
Here’s the script!
$VDIs = get-content .\vdi.csv
foreach ($VDI in $VDIs){
write-host $VDI is being copied from a VHD template. This will take approxmiately 2 minutes…
copy “F:\Hyper-V\Virtual Hard Disks\vdi-template.vhd” “F:\Hyper-V\Virtual Hard Disks\$VDI.vhd”
New-VM -Name $VDI -BootDevice IDE -VHDPath “F:\Hyper-V\Virtual Hard Disks\$VDI.vhd” -MemoryStartupBytes 2GB -SwitchName “External”
Set-VMMemory -VMName $VDI -DynamicMemoryEnabled $true -MinimumBytes 512MB -StartupBytes 2GB -MaximumBytes 4GB
Set-VM -Name $VDI -AutomaticStopAction Shutdown
write-host $VDI Has now been created and ready for use…
}
It’s a quick and dirty script – I’ll look at building it out as future requirements dictate.
PowerShell: Remotely rename Windows Computers from CSV file
I recently setup a bunch of Windows 7 VDI systems for a customer. They asked if they could rename them to a different naming convention. I definitely didn’t want to have to login to each one or run psexec. Thankfully with Windows Management Framework(a prerequisite) & Powershell this is very straight forward.
1st Step: Run Get-ADComputer with your desired filter and export to CSV file for use in step 3. All of my new VDI systems contained the syntax “vdi” so I used this as my filter.
Get-ADComputer -Filter {Name -like “*vdi*”} | select-object Name | Export-Csv .\RenameComputers.csv -NoTypeInformation
![]()
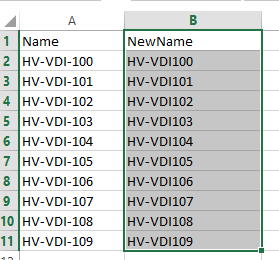
2nd Step:
Open your new CSV in Excel and add a new row called “NewName”, add the corresponding new computer names & save:
3rd Step:
Prompts for credentials used to connect to the machine remotely, imports the csv, runs the rename-computer cmdlet using the content Name & NewName from the CSV & renames the computer.
$cred = get-credential
$Computers = import-csv .\RenameComputers.csv
foreach ($Computer in $Computers){
Rename-Computer -NewName $Computer.NewName -ComputerName $Computer.Name -DomainCredential $cred -Restart
}
SCSM: “An error was encountered while running the task”
I recently came across an unusual issue with Service Manager were all of the connectors stopped functioning. Any time I went into the properties or attempted to create a new connector (in particular when starting to create and selecting test authentication), the connector would crash with the following error:
Application: System Center Service Manager
Application Version: 7.5.3079.0
Severity: Error
Message: An error was encountered while running the task.
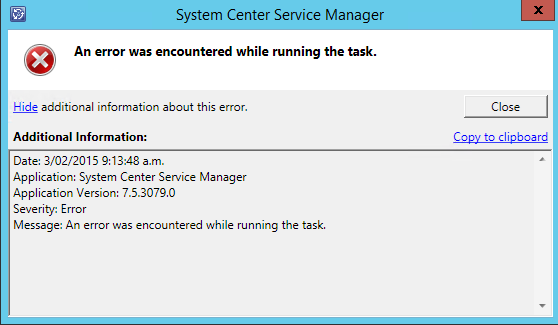
Really helpful message…
I had seen a similar issues previously with the Exchange Connector due to a corrupted Default SR or IR Template. As this was in the sandbox environment, I started removing custom Management Packs as a test – all that had been created since the connector had stopped working. None of this resolved the issue.
The issue it turned out was with the System Center Operations Manager Agent installed on the SCSM server.
The Microsoft SCOM Agent is bundled in with Service Manager by default. I have ran into several random issues before with System Center Operations Manager, where I needed to rebuild the Health Service State folder by stopping the “Microsoft Monitoring Agent” and renaming this folder. On the SCSM server, the service is still the same but the Health State is in a different location.
First, stop the service:
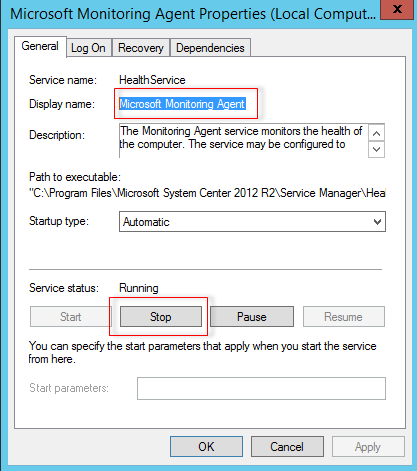
Rename the SCOM Health Service State Folder (Located: C:\Program Files\Microsoft System Center 2012 R2\Service Manager\Health Service State)

Restart the Microsoft Monitoring Agent (this will recreate the Health Service State folder).
You should now be able to create connectors!