
Manually Remove Incidents, Service Requests, etc. from Service Manager 2012/2012 R2
With System Center Service Manager 2012/2012 R2, you may find you need to delete various Incident Requests, Service Requests before waiting for them to prune out of the database. This could apply in a testing situation, when you are generating lots of test tickets, etc. (Or if you find you have a Operations Manager alert storm!). From PowerShell with the Service Manager module loaded, run the following commands:
![]()
#Remove IR from Database. Replace IRx with corresponding Incident Request number (ie. IR16, etc.)
Get-SCSMClassInstance -Class (Get-SCSMClass -Name System.WorkItem.Incident) | Where-Object {$_.ID -eq “IRx”} | Remove-SCSMClassInstance
or
#Remove SR from Database. Replace SRx with corresponding Service Request number (ie. SR16, etc.)
Get-SCSMClassInstance -Class (Get-SCSMClass -Name System.WorkItem.ServiceRequest) | Where-Object {$_.ID -eq “SRx”} | Remove-SCSMClassInstance
![]()
Refresh your SCSM Console and it should now be gone from the list.

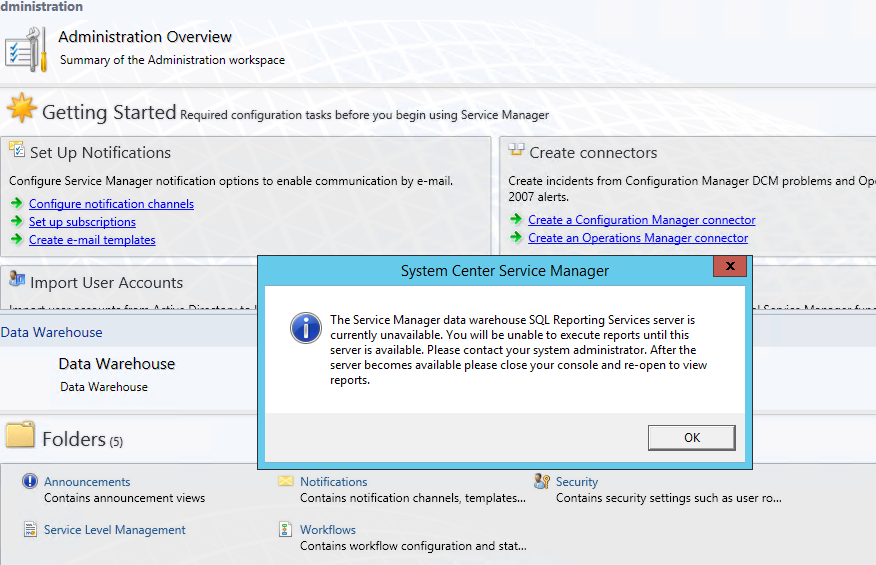
The Service Manager data warehouse SQL Reporting Services server is currently unavailable
Recently, while rolling out System Center Service Manager 2012 R2 for a customer, I received the following error when opening Service Manager as it attempted to load the SQL Reporting Services plugin: “The Service Manager data warehouse SQL Reporting Services server is currently unavailable. You will be unable to execute reports until this server is available.”
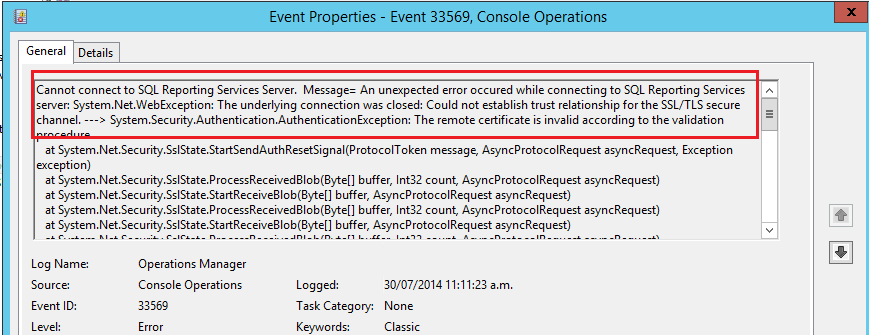
The even log showed Event ID 33569:
Cannot connect to SQL Reporting Services Server. Message= An unexpected error occurred while connecting to SQL Reporting Services server: System.Net.WebException: The underlying connection was closed: Could not establish trust relationship for the SSL/TLS secure channel. —> System.Security.Authentication.AuthenticationException: The remote certificate is invalid according to the validation procedure.
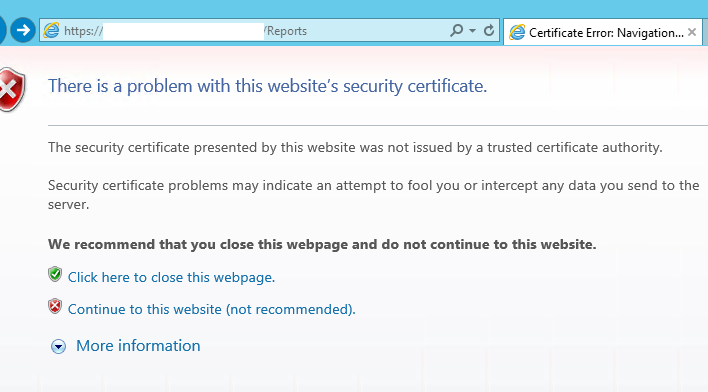
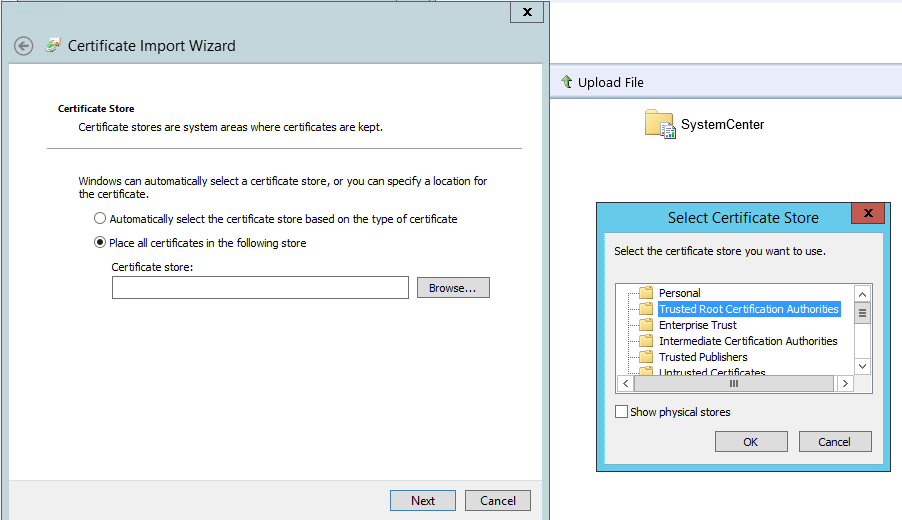
The last line was the key. Ideally you would want to put a trusted cert from your CA onto the SQL Reporting Services Server but the work around would be to make the certificate trusted on the machine running the Service Manager Console.
Browse to the SQL Reporting Services web page, click past the cert error.
Click on the certificate icon at the top and “View Certificate”

Install the certificate into your local machine Trusted Root Certification Authorities.
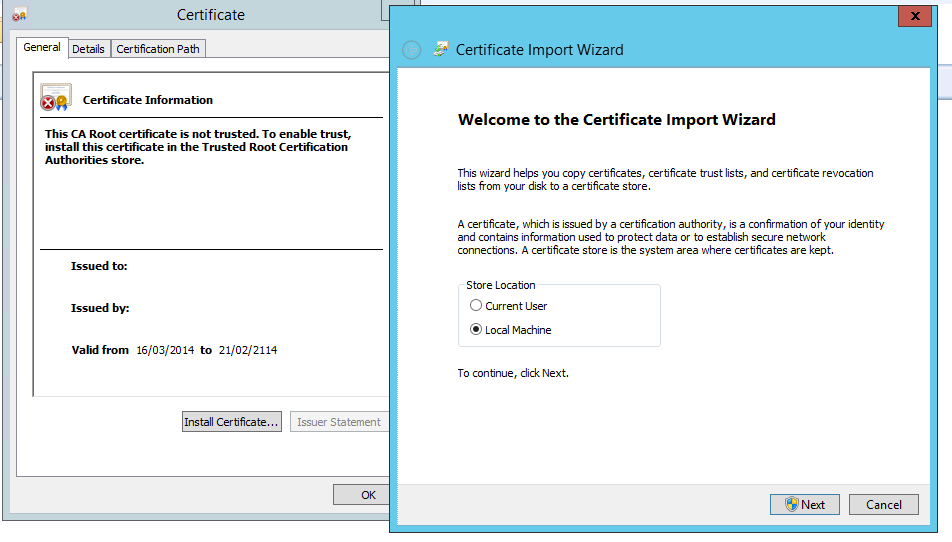
Now go back and re-open the SCSM Console and all should be good!
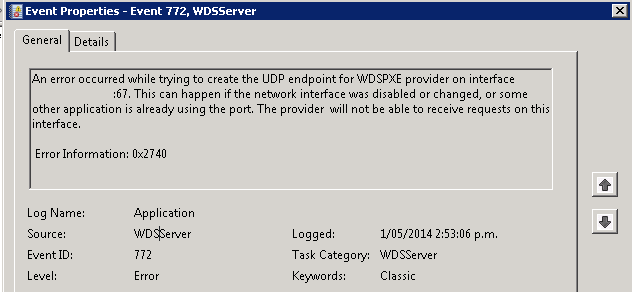
Windows Deployment Services service will not start (Error 0x2740 )
Starting Windows Deployment Services on a recently assigned Distribution Point for System Center Configuration Manager, I received the following error in the Application Event log on the DP:
An error occurred while trying to create the UDP endpoint for WDSPXE provider on interface x.x.x.x:67. This can happen if the network interface was disabled or changed, or some other application is already using the port. The provider will not be able to receive requests on this interface.
Error Information: 0x2740
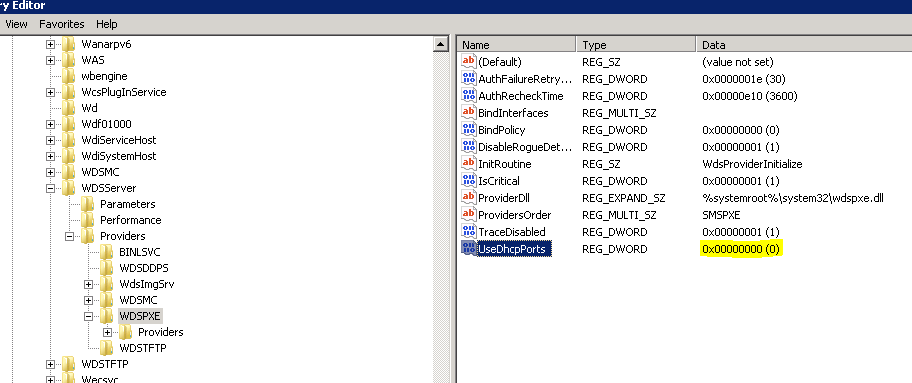
This was because the DP was setup as a DHCP server and for WDS. Unfortunately WDSUTIL /set-server /UseDHCPPorts:No did not work. The fix was to perform the following registry change:
HKEY_LOCAL_MACHINE\SYSTEM\CurrentControlSet\Services\WDSServer\Providers\WDSPXE
Set the registry value to: UseDHCPPorts = 0
The service then started without any issues.
Note: Another thing to remember, is that if you are running your WDS server on your DHCP server, you will need to set the 060 option in your DHCP Server Options. From a command prompt run the following command:WDSUTIL /set-server /DHCPOption60:yes
System Center PXE/WDS “Processor Architecture Boot Image (0) not found”
When setting up a new System Center Distribution Point recently, I received the following error in the SMSPXE.log:
Warning: Matching Processor Architecture Boot Image (0) not found
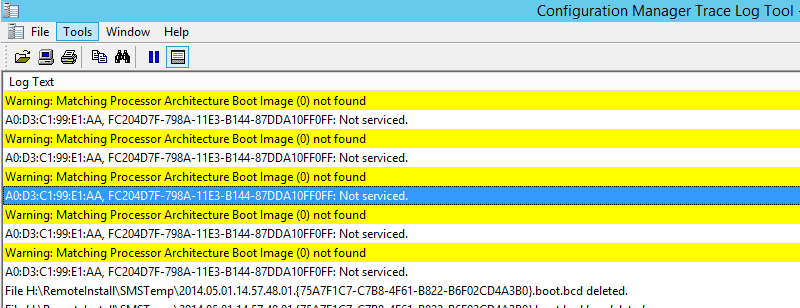
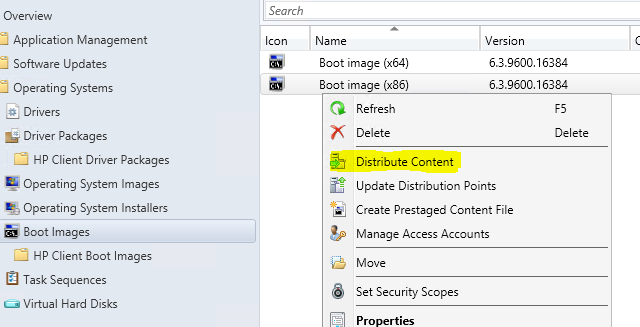
This is because, even if you only using the x64 WinPE image, SCCM/WDS requires that both x64 & x86 to be present. Simply distribute your x86 image from SCCM and restart the Windows Deployment Service on your Distribution Point.
![]()
WMI Model Query for System Center or MDT Task Sequence
In order to specify device driver install package for a specific model during your SCCM or MDT task sequence, you can create a WMI Query for the specific models covered by your driver pack. ie.
Select * From Win32_ComputerSystem WHERE Model LIKE “%HP%%600” or LIKE “%HP%%800”
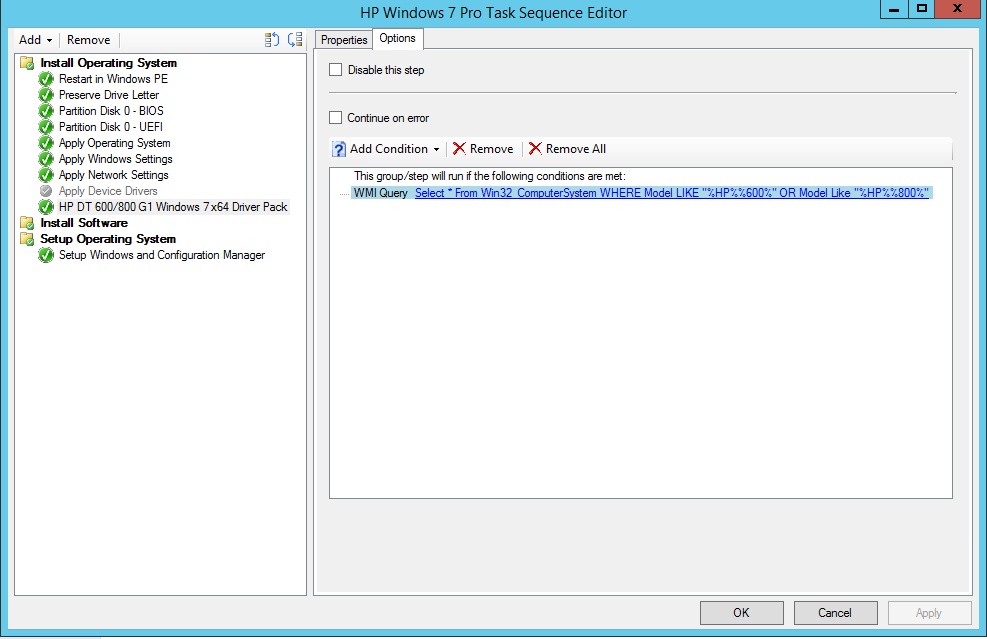
To find the WMI specific model info, open command prompt and run the following commands:

In the above example, as I am running an HP Zbook 15, it would be Select * From Win32_ComputerSystem WHERE Model LIKE “%HP%%Zbook”
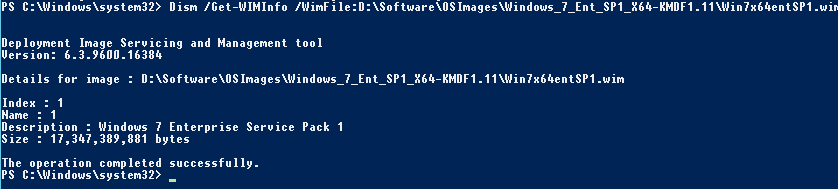
Offline Servicing DISM/WIM – SCCM PXE Deployment
Recently while testing an System Center Configuration Manager 2012 R2 PXE Deployment on a new HP Elitebook 840 or 850, I received the following error:
“Windows could not configure one or more system components. To install Windows, restart the computer and then restart the installation.”
The reason for this is that the new hardware requires a later version of the Kernel Mode Driver Framework than is included with the Windows 7 install media. The easiest fix for that is to download a copy of the updated Framework: http://support.microsoft.com/kb/2494168. From there we can perform an offline servicing of the WIM image using the DISM command.
Dism /Get-WIMInfo /WimFile:D:\Software\OSImages\Windows_7_Ent_SP1_X64-KMDF1.11\Win7x64entSP1.wim
Dism /Mount-WIM /WimFile:D:\Software\OSImages\Windows_7_Ent_SP1_X64-KMDF1.11\Win7x64entSP1.wim /index:1 /MountDir:D:\Temp\offline

Dism /image:D:\Temp\offline /Add-Package /PackagePath:D:\Software\Patches\kmdf-1.11-Win-6.1-x64\Windows6.1-KB2685811-x64.cab

Finally: Dism /Unmount-WIM /MountDir:D:\Temp\offline /Commit. Update your distribution points with updated WIM and re-run deployment to resolve.
VMM cannot complete the host operation on the hvhost.x.x
In Virtual Machine Manager or Hyper-V, when accessing an ISO from VMM Library Server, you may find the following message:

Error (12700)
VMM cannot complete the host operation on the hvhost.x.x server because of the error: ‘VM’ failed to add device ‘Virtual CD/DVD Disk’. (Virtual machine ID B3C07289-26B9-4D52-977D-91F5DB15C6A1)
‘VM’: User account does not have permission required to open attachment ‘\\SCVMM.x.x\MSSCVMMLibrary\ISOs\Microsoft\MS Server 2008 R2\en_windows_server_2008_r2_standard_enterprise_datacenter_web_vl_build_x64_dvd_x15-59754.iso’. Error: ‘General access denied error’ (0x80070005). (Virtual machine ID B3C07289-26B9-4D52-977D-91F5DB15C6A1)
Unknown error (0x8001)
Recommended Action
Resolve the host issue and then try the operation again.To work around this, you will need to
a) Provide full NTFS & Share access to the Hyper-V’s host’s Computer Account for the MSCVMMLibrary Share

b) Setup constrained delegation in AD for the Hyper-V Host
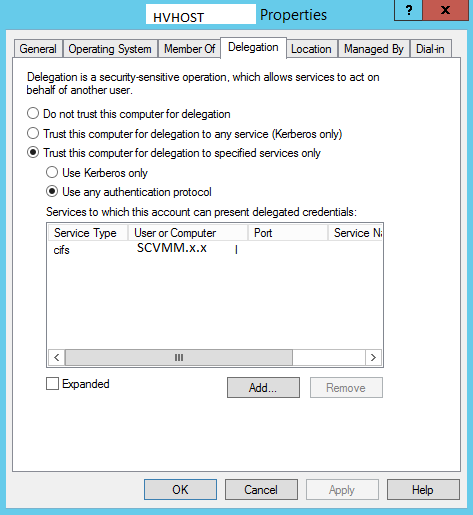
After completing the steps listed above, you should be able to attach your ISO without any issues.