
“You cannot use the vSphere Client to edit the settings of virtual machines of version 10 or higher.”
After using the VMware 5.5 Convertor to perform a physical to virtual migration, I noted the following error when attempting to edit the properties of the VM in vSphere:
“You cannot use the vSphere Client to edit the settings of virtual machines of version 10 or higher.”

Thankfully there is an easy work around!
Confirm the VM is powered-off.
Right-click the VM and remove from inventory:
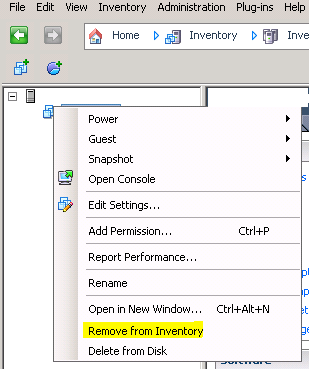
Enable SSH on the host and connect.

Change directory to your vm:
cd /vmfs/volumes/YOURDATASTORENAMEHERE/YOURVMNAME

Open your VMX file with vi:
vi VMNAME.vmx
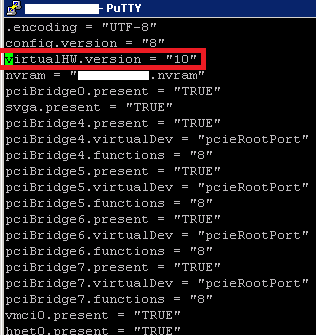
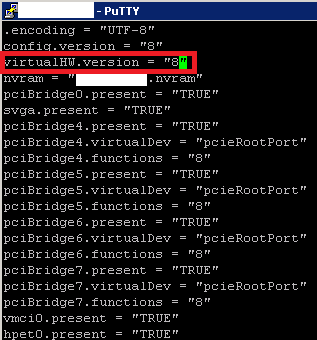
![]()
Find the line that says ‘virtualHW.version'(ie.virtualHW.version = “10”) and change to “8”
Hint: Delete 10, type “i” to start editing, put 8 between the quotes, then Esc key when done, “:wq” to save changes (:q! to exit without saving).
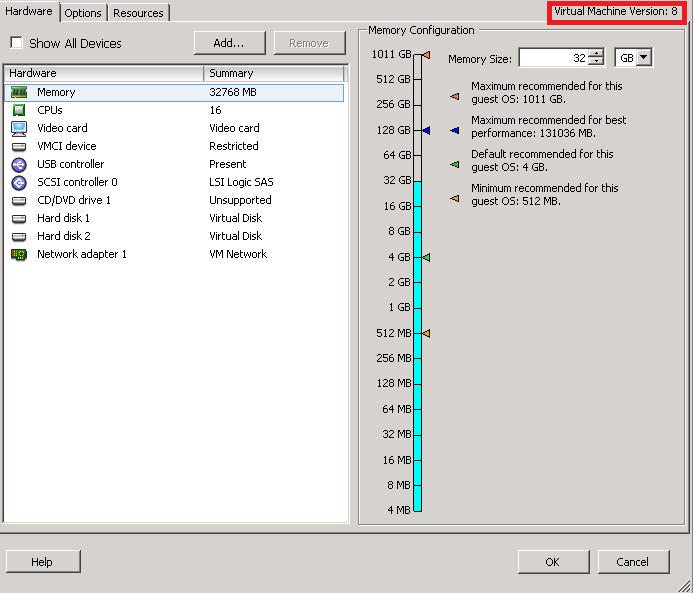
Re-register the VM in Vsphere: vim-cmd solo/registervm /vmfs/volumes/YOURDATASTORENAMEHERE/YOURVMDIRECTORY/YOURVM.vmx
You should now be able to edit your VM!
Insufficient resources to satisfy HA
After building or converting a new VM, you may find the following error when you power it on:
![]()
This is due to Admission Control in VMware calculating your current host utilization and determining you wouldn’t have enough resources available to run your VMs in case of a host failure, based on the settings specified. Ideally, you should add the adjust host/vm resources to ensure that your Admission Control can be met. If not, Admission Control can be adjusted if required by right-clicking on your Cluster and selecting “Edit Settings:
Next, select vSphere HA and either a) Disable Admission Control or b) Adjust your Admission Control Policy:

VMware Scan/Stage/Remediate Patching Fails
I was recently patching an ESXi 5.1 host received the following error when attempted to scan, stage or remediate the host:
![]()
None of the rest of the hosts in the cluster had any issues, so I assumed the issue was with the host. I then went and checked the Update Manager logs for further info. These logs are located under: C:\Users\All Users\VMware\VMware Update Manager\Logs. In the vmware-vum-server-log4cpp.log file in this folder. I search for error or warning in the text editor to look for potential issues. This led me to the following error: Platform Configuration Error: /usr/sbin/esxupdate returned no results, exit status: 1
![]()
I then searched Google and came across the following article for VMware: http://kb.vmware.com/selfservice/microsites/search.do?language=en_US&cmd=displayKC&externalId=2014538
Followed the steps listed in the KB:
To check if the vmsyslogd service is running, run the command:
ps | grep vmsyslogd
If there is no output, the service is not running.
To start the vmsyslogd service, run the command:
/usr/lib/vmware/vmsyslog/bin/vmsyslogd
To reload vmsyslogd , run the command:
esxcli system syslog reload
To verify that the vmsyslogd service is running, re-run the command:
ps | grep vmsyslogd
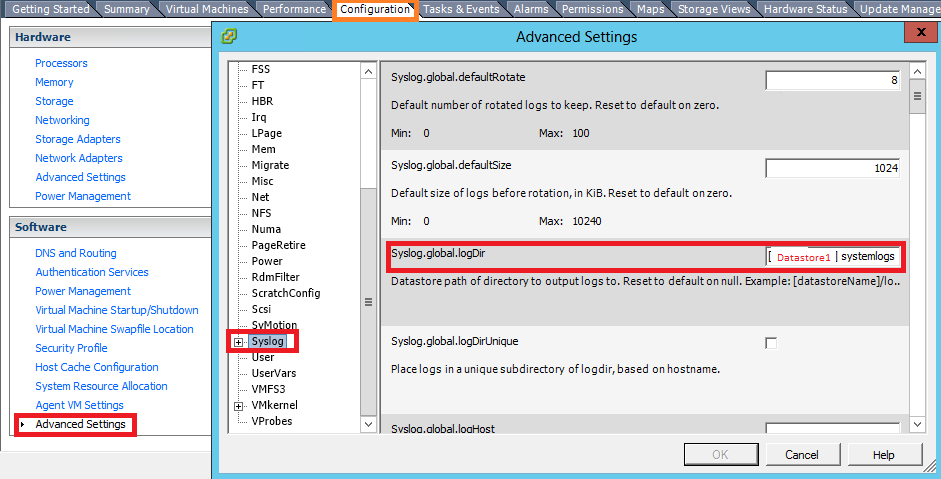
I discovered the following error in the syslog output after running esxcli system syslog reload command listed above:
![]()
From there, changed the path location for Syslog on the host, selected ok and was then able to scan(this was the actual issue)/stage/remediate the host!
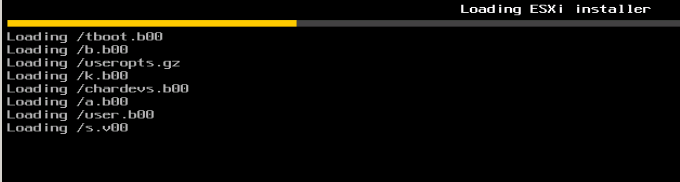
ESXi 5.1 Manual/Force Upgrade
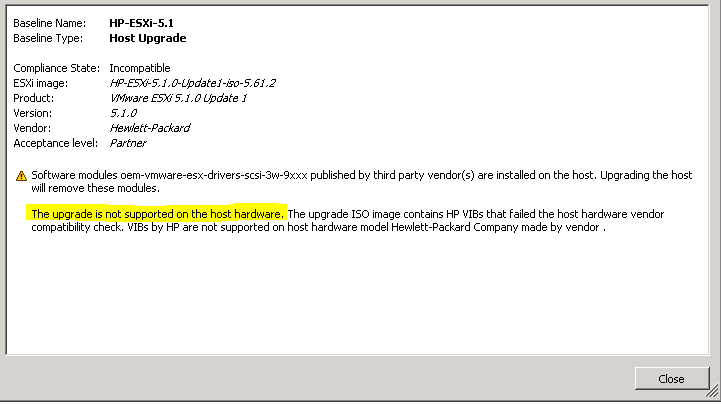
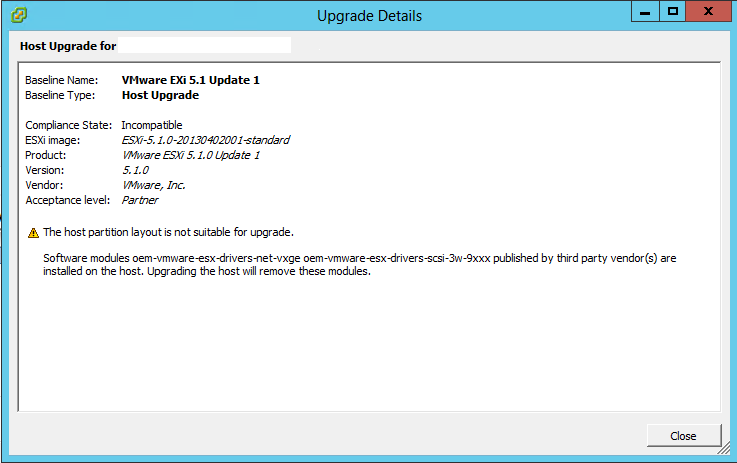
One of the great features of vCenter 5.1 is the ability to upgrade older 4.x ESX/ESXi hosts to 5.1 from within Upgrade Manager. This being said, I have had several recent deployments where this has not being an option due to perceived incompatibilities between installation media (both branded & unbranded) and the host. The other issue I have found is that the Update Manager method doesn’t automatically recognize the ESX/ESXi partition. Even after installing the latest host firmware(which I would highly recommended) and confirming it is on the compatibility list of supported hardware for ESXi 5.1 I still receive “The upgrade is not supported on the host hardware. The upgrade ISO image contains HP (or other vendor) VIBs that failed the host hardware vendor compatibility check. VIBs by HP are not supported on host hardware model Hewlett-Packard Company made by vendor.”
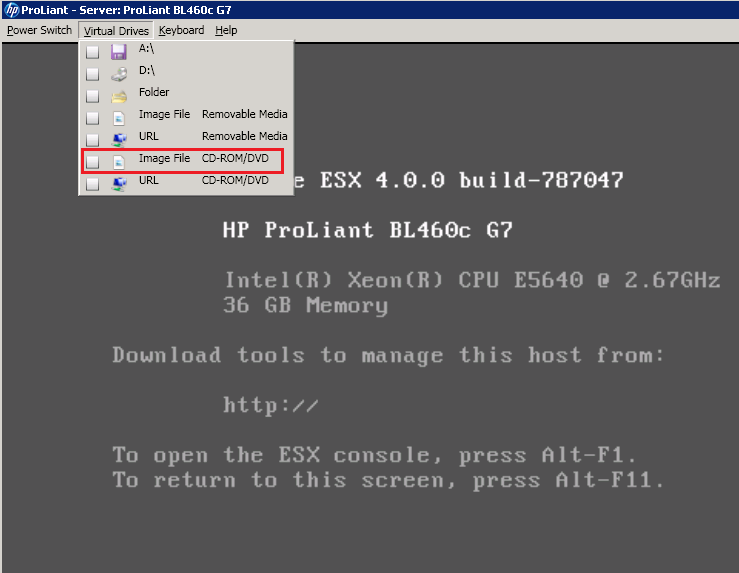
It is possible to customize your install image and add/remove VIBs as required but I have found the easiest way to resolve this is by doing a manual upgrade. This can be done be done directly from the host, or my preferred method – Out-of-Band Management, Dell DRAC, HP iLO, IBM AMM, etc.
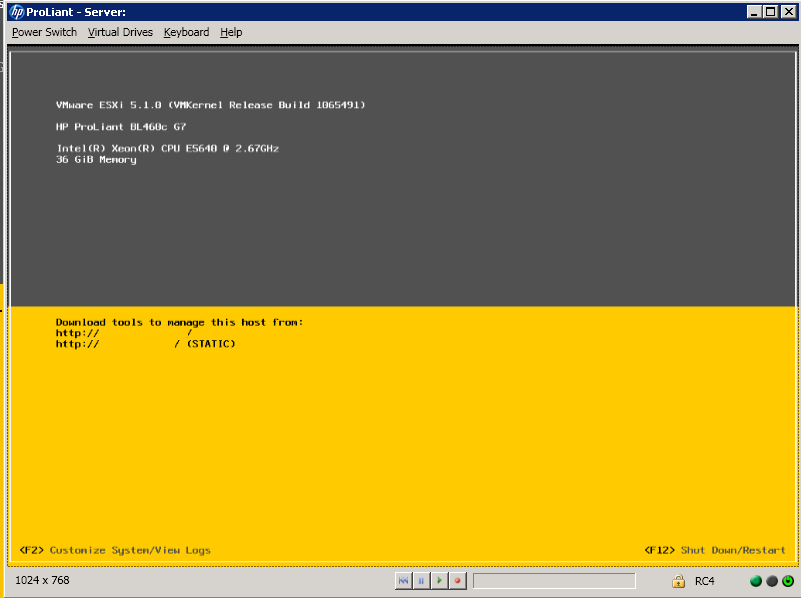
Mount your VMware ESXi 5.1 media (or insert CD) and restart host.

You will see the ESXI 5.1 Splash Screen which will continue to load the various modules

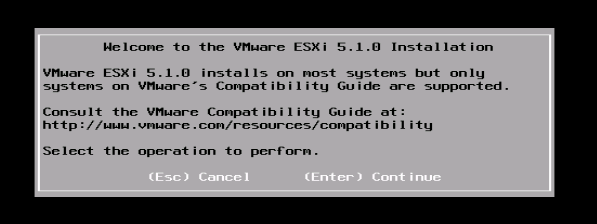
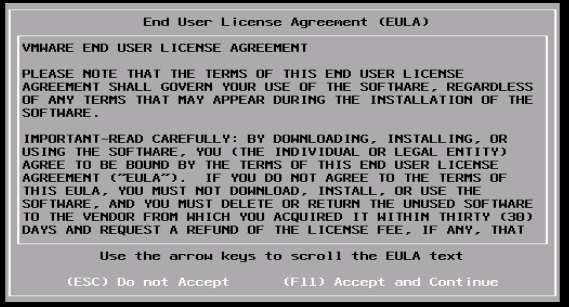
After all the modules load (Approx. 5-10min) you will be presented with the following install screen. Hit enter on your keyboard to continue past this screen & F11 to accept the EULA on the following.
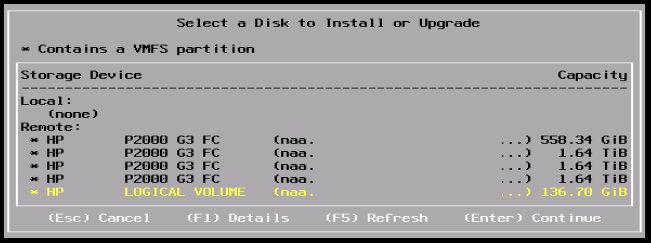
The installer then scans through available hardware and you are faced Disk selection option. Select your ESX/ESXi install volume and press Enter to continue.
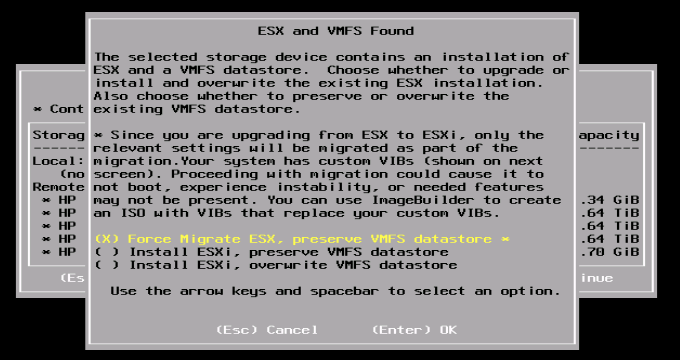
You are then faced with upgrade/install options. IMPORTANT: Do NOT select overwrite VMFS datastore unless you are prepared to lose all of your Virtual Machines or really enjoy restoring all of your data from backups… Select Force Migrate ESX, preserve VMFS datastore and Enter to continue. On the following screen you are asked to confirm. Hit F11 if you are happy to proceed

Depending on your hardware, after approximately 10-15min you should see a message indicating “Force Migrate Complete.” Select enter to reboot.

After couple of reboots you should find yourself at the VMware ESXi 5.1 splash screen and be able to access your host via vCenter 5.1.
![]()
vCenter “Host currently has no management network redundancy”
We recently had an IBM Blade environment where the HA Heartbeat/Management network were sharing the same NIC due to hardware constraints. This will cause an alert warning in vCenter.


Ideally, you would be best to add a second NIC to the management VMkernel Port, either with NIC teaming or in standby. If you are aware of this but would like to suppress the message anyway, take the following steps:
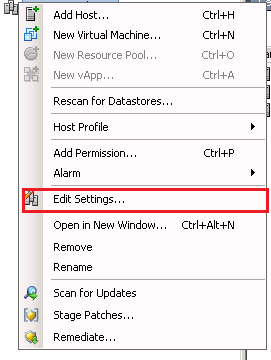
Right-click on your HA cluster in your vSphere Client, select “Edit Settings”

Click on vSphere HA & select “Advanced Options”, add the following line:
Option: das.ignoreRedundantNetWarning
Value: true
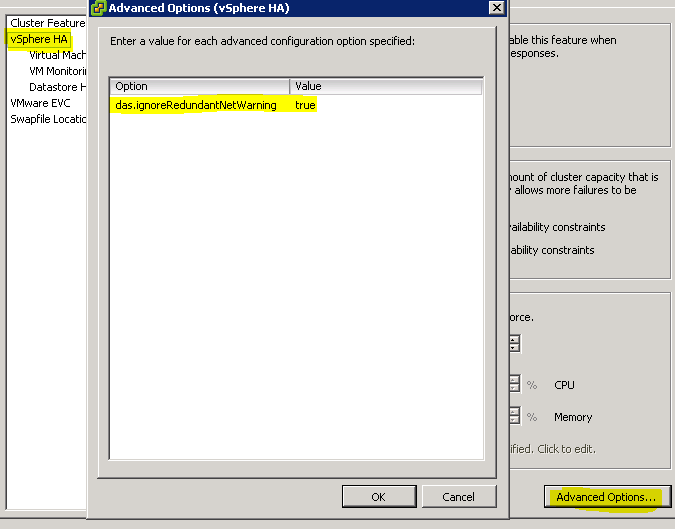
Click Ok twice, right the host with the error and select “Reconfigure for vSphere HA” and after a few moments the error should disappear.

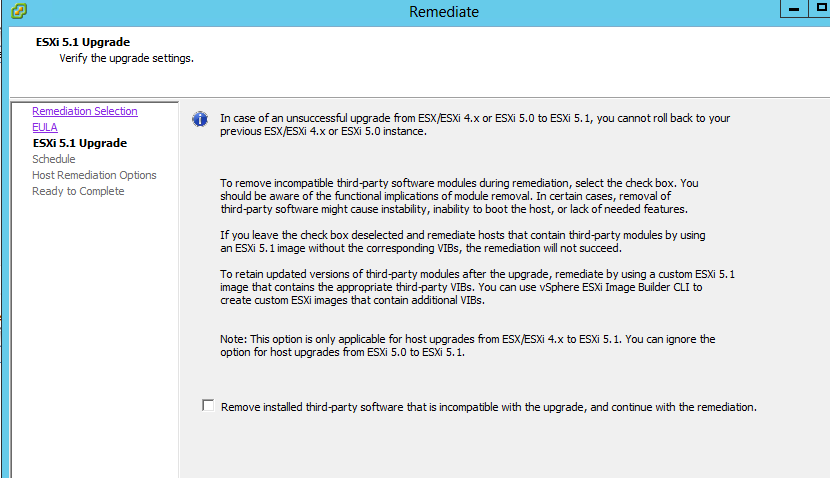
VMware ESX/ESXi 4.1 host upgrade failed due to 3rd party updates
I’ve recently been running several ESX 4.1 to ESXi 5.1 Upgrades. Generally this is a much easier process due to the Update Manager now handling ESX/ESXi 4.+ Upgrades directly from the vCenter. That being said, I have ran into the following issue when running an upgrade:
The majority of upgrade errors I have encountered are generally due to custom VIBs that are no longer compatible & can be bypassed by selecting the box for “Remove installed third-party software that is incompatible with the upgrade, and continue with the remediation.”
In this situation however, I’ve found you need to remove the problem patch before getting to this screen. The easiest way to perform this is by connecting via console or SSH to your ESX host and running the following command: “esxupdate query -a”.
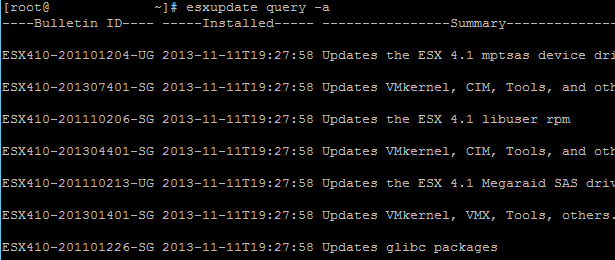
This will give you a list of installed updates. From here, find the problem patch – in my case ESX410-201101223-UG & ESXi410-201101224-UG & run the following command for each:
esxupdate -b ESX410-201101223-UG remove
esxupdate -b ESX410-201101224-UG remove
![]()
Reboot your host and continue your upgrade