
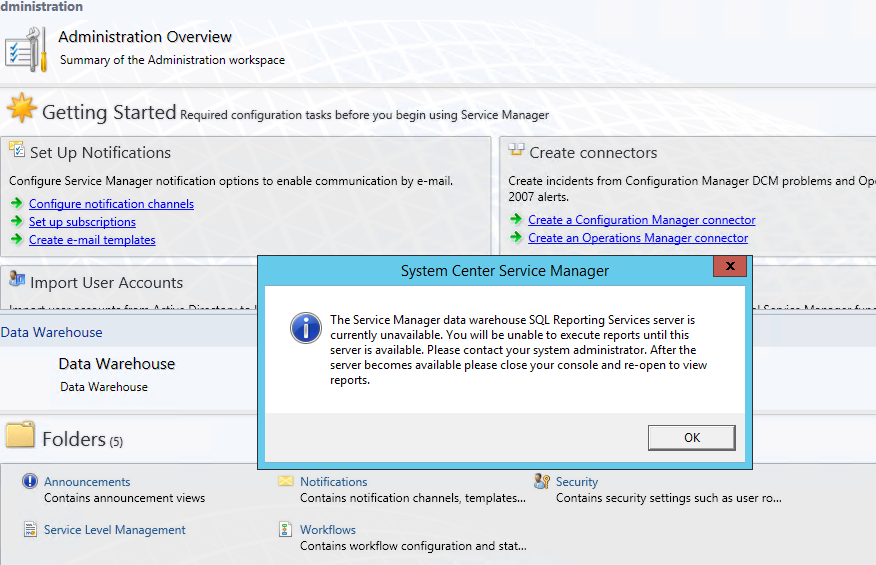
The Service Manager data warehouse SQL Reporting Services server is currently unavailable
Recently, while rolling out System Center Service Manager 2012 R2 for a customer, I received the following error when opening Service Manager as it attempted to load the SQL Reporting Services plugin: “The Service Manager data warehouse SQL Reporting Services server is currently unavailable. You will be unable to execute reports until this server is available.”
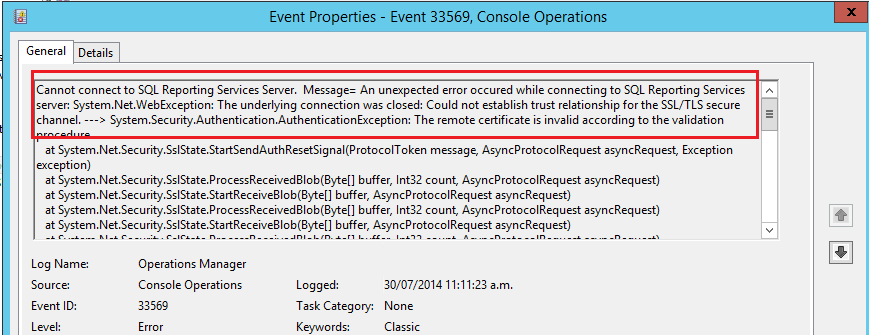
The even log showed Event ID 33569:
Cannot connect to SQL Reporting Services Server. Message= An unexpected error occurred while connecting to SQL Reporting Services server: System.Net.WebException: The underlying connection was closed: Could not establish trust relationship for the SSL/TLS secure channel. —> System.Security.Authentication.AuthenticationException: The remote certificate is invalid according to the validation procedure.
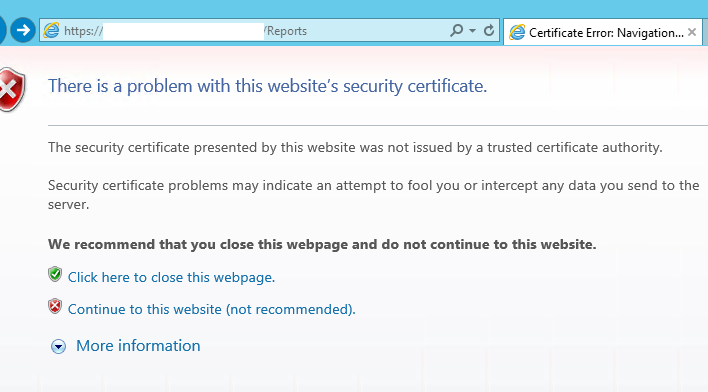
The last line was the key. Ideally you would want to put a trusted cert from your CA onto the SQL Reporting Services Server but the work around would be to make the certificate trusted on the machine running the Service Manager Console.
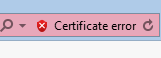
Browse to the SQL Reporting Services web page, click past the cert error.
Click on the certificate icon at the top and “View Certificate”
Install the certificate into your local machine Trusted Root Certification Authorities.
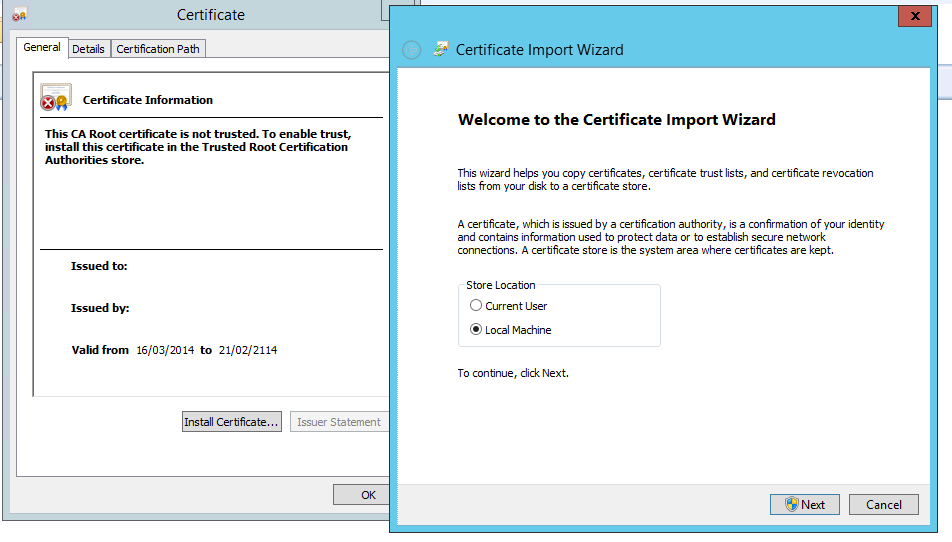
Now go back and re-open the SCSM Console and all should be good!
Migrate 2008 DHCP to Server 2012 R2 with DHCP Failover
Recently needed to migrate an existing 2008 DHCP server to two new Server 2012R2 DHCP servers with Failover enabled. Thankfully, this is a very straightforward process!
Logged onto to one of your new DHCP servers run the following PowerShell commands:
Export-DhcpServer –ComputerName OLDDHCPSERVERNAME.company.local -Leases -File C:\OLDDHCPSERVER-dhcpexp.xml -verbose
Import-DhcpServer –ComputerName NEWDHCPSERVER1.company.local -Leases –File C:\OLDDHCPSERVER-dhcpexp.xml -BackupPath C:\dhcp\backup\ -Verbose
Import-DhcpServer –ComputerName NEWDHCPSERVER2.company.local –File C:\OLDDHCPSERVER-dhcpexp.xml –ServerConfigOnly –verbose –BackupPath C:\dhcp\backup\
Note: If the C:\dhcp\backup\ path doesn’t exist you will need to re-run the command or create it first.
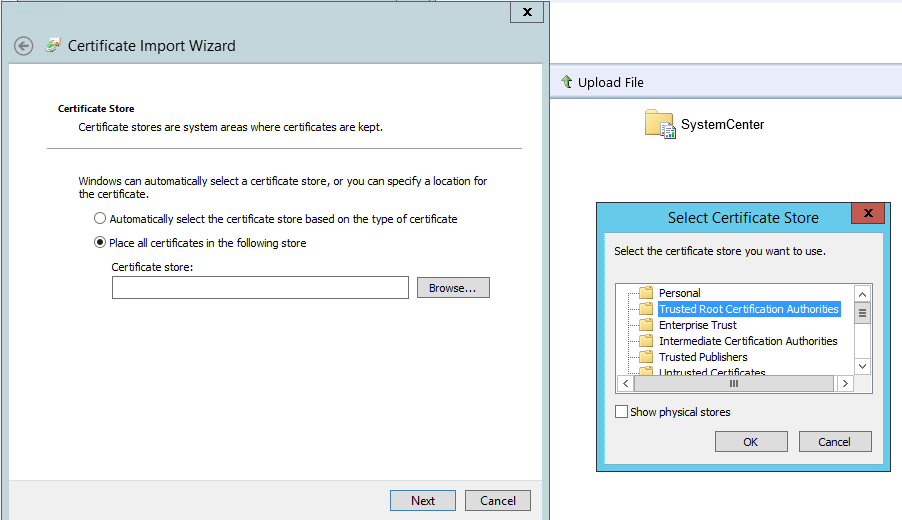
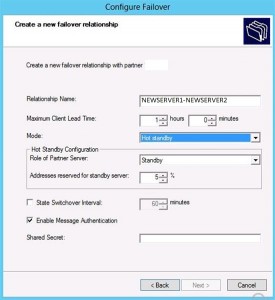
Next to enable the new failover functionality, right-click on your scope and select “Configure Failover.”
Specify “Hot standby” and specify your reservervation for standby server(this can generally be fairly low as clients will hold their lease for awhile.). Specify a State Switchover Interval if you want your server to automatically failover after a period of disruption on the primary server. Finally enable a Message Authentication Shared Secret if desired between the servers.
That’s it! 🙂
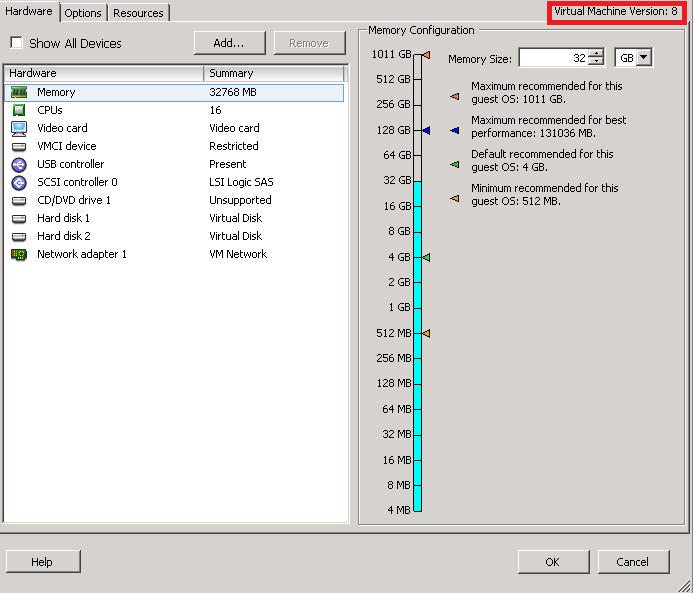
“You cannot use the vSphere Client to edit the settings of virtual machines of version 10 or higher.”
After using the VMware 5.5 Convertor to perform a physical to virtual migration, I noted the following error when attempting to edit the properties of the VM in vSphere:
“You cannot use the vSphere Client to edit the settings of virtual machines of version 10 or higher.”

Thankfully there is an easy work around!
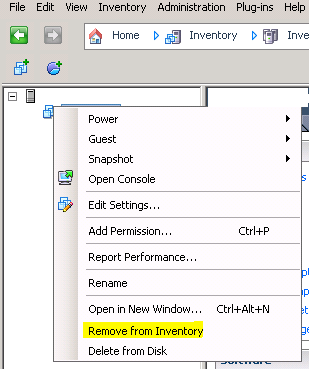
Confirm the VM is powered-off.
Right-click the VM and remove from inventory:
Enable SSH on the host and connect.

Change directory to your vm:
cd /vmfs/volumes/YOURDATASTORENAMEHERE/YOURVMNAME

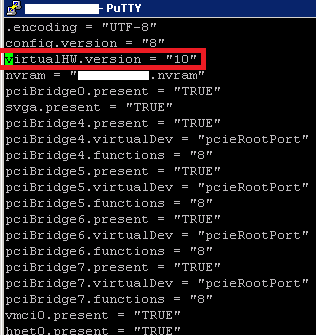
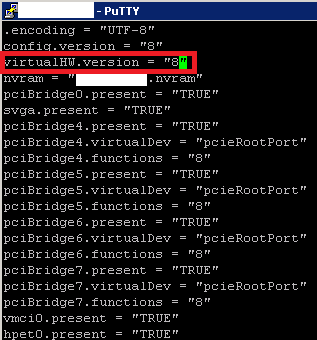
Open your VMX file with vi:
vi VMNAME.vmx
![]()
Find the line that says ‘virtualHW.version'(ie.virtualHW.version = “10”) and change to “8”
Hint: Delete 10, type “i” to start editing, put 8 between the quotes, then Esc key when done, “:wq” to save changes (:q! to exit without saving).
Re-register the VM in Vsphere: vim-cmd solo/registervm /vmfs/volumes/YOURDATASTORENAMEHERE/YOURVMDIRECTORY/YOURVM.vmx
You should now be able to edit your VM!
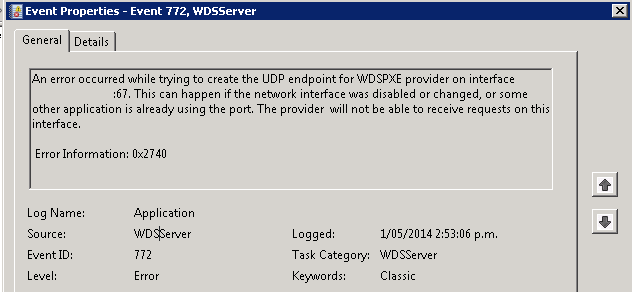
Windows Deployment Services service will not start (Error 0x2740 )
Starting Windows Deployment Services on a recently assigned Distribution Point for System Center Configuration Manager, I received the following error in the Application Event log on the DP:
An error occurred while trying to create the UDP endpoint for WDSPXE provider on interface x.x.x.x:67. This can happen if the network interface was disabled or changed, or some other application is already using the port. The provider will not be able to receive requests on this interface.
Error Information: 0x2740
This was because the DP was setup as a DHCP server and for WDS. Unfortunately WDSUTIL /set-server /UseDHCPPorts:No did not work. The fix was to perform the following registry change:
HKEY_LOCAL_MACHINE\SYSTEM\CurrentControlSet\Services\WDSServer\Providers\WDSPXE
Set the registry value to: UseDHCPPorts = 0
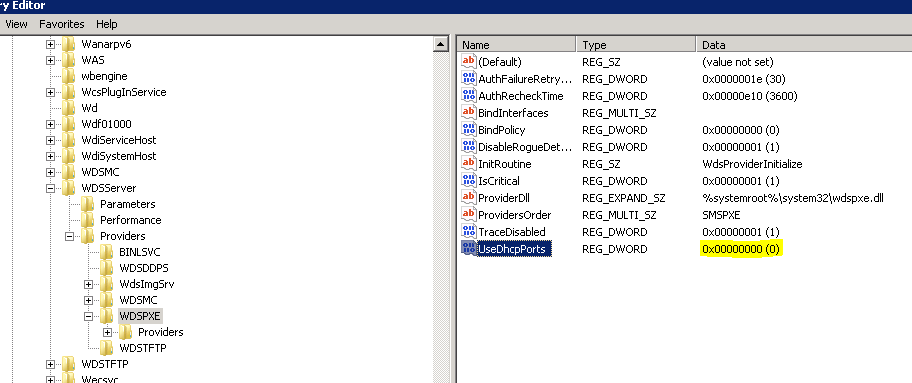
The service then started without any issues.
Note: Another thing to remember, is that if you are running your WDS server on your DHCP server, you will need to set the 060 option in your DHCP Server Options. From a command prompt run the following command:WDSUTIL /set-server /DHCPOption60:yes
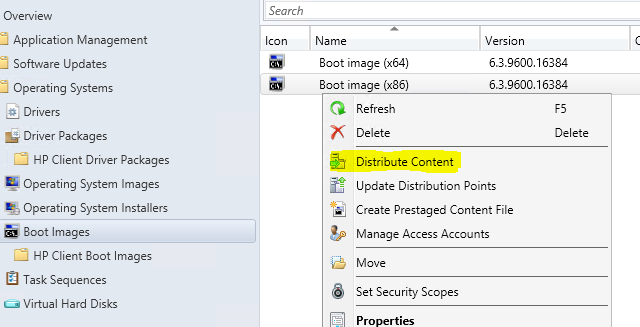
System Center PXE/WDS “Processor Architecture Boot Image (0) not found”
When setting up a new System Center Distribution Point recently, I received the following error in the SMSPXE.log:
Warning: Matching Processor Architecture Boot Image (0) not found
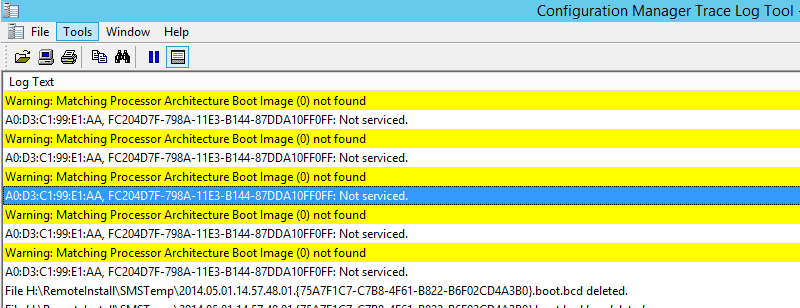
This is because, even if you only using the x64 WinPE image, SCCM/WDS requires that both x64 & x86 to be present. Simply distribute your x86 image from SCCM and restart the Windows Deployment Service on your Distribution Point.
![]()
WMI Model Query for System Center or MDT Task Sequence
In order to specify device driver install package for a specific model during your SCCM or MDT task sequence, you can create a WMI Query for the specific models covered by your driver pack. ie.
Select * From Win32_ComputerSystem WHERE Model LIKE “%HP%%600” or LIKE “%HP%%800”
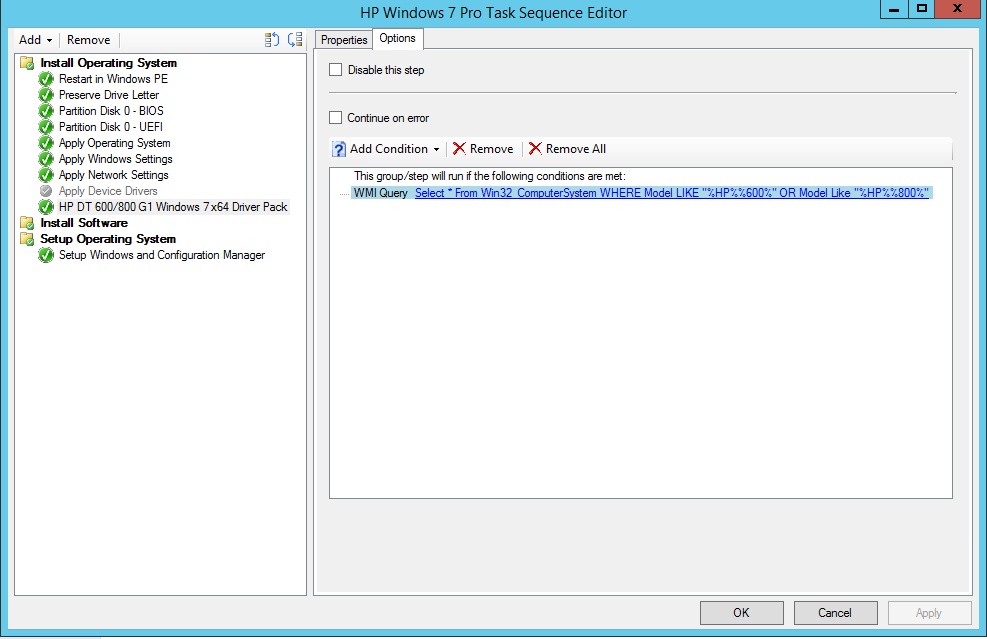
To find the WMI specific model info, open command prompt and run the following commands:

In the above example, as I am running an HP Zbook 15, it would be Select * From Win32_ComputerSystem WHERE Model LIKE “%HP%%Zbook”
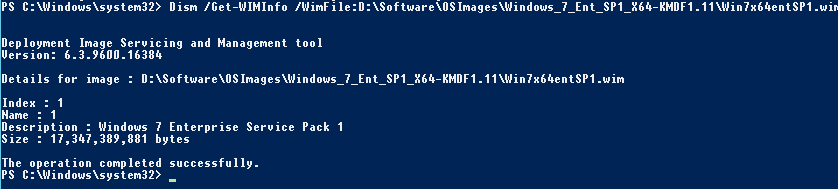
Offline Servicing DISM/WIM – SCCM PXE Deployment
Recently while testing an System Center Configuration Manager 2012 R2 PXE Deployment on a new HP Elitebook 840 or 850, I received the following error:
“Windows could not configure one or more system components. To install Windows, restart the computer and then restart the installation.”
The reason for this is that the new hardware requires a later version of the Kernel Mode Driver Framework than is included with the Windows 7 install media. The easiest fix for that is to download a copy of the updated Framework: http://support.microsoft.com/kb/2494168. From there we can perform an offline servicing of the WIM image using the DISM command.
Dism /Get-WIMInfo /WimFile:D:\Software\OSImages\Windows_7_Ent_SP1_X64-KMDF1.11\Win7x64entSP1.wim
Dism /Mount-WIM /WimFile:D:\Software\OSImages\Windows_7_Ent_SP1_X64-KMDF1.11\Win7x64entSP1.wim /index:1 /MountDir:D:\Temp\offline

Dism /image:D:\Temp\offline /Add-Package /PackagePath:D:\Software\Patches\kmdf-1.11-Win-6.1-x64\Windows6.1-KB2685811-x64.cab

Finally: Dism /Unmount-WIM /MountDir:D:\Temp\offline /Commit. Update your distribution points with updated WIM and re-run deployment to resolve.
Set SharePoint site to read-only
In some situations you may have a need to set a SharePoint site to read-only. In my case because we were moving the customer from WSS 3 to SharePoint 2013 and needed to reference the old data, while testing to confirm there were no issues with the new site. This can be done using the following command from the SharePoint bin folder:
stsadm -o setsitelock -url http://sharepointsite -lock readonly
![]()
Veeam: A VSS critical writer has failed
While deploying Veeam Backup & Replication recently for a customer, we came across the following error message while backing up a domain controller:
Unable to release guest. Error: Unfreeze error: [Backup job failed.
Cannot create a shadow copy of the volumes containing writer’s data.
A VSS critical writer has failed. Writer name: [NTDS]. Class ID: [{b2014c9e-8711-4c5c-a5a9-
3cf384484757}]. Instance ID: [{bcc3ddec-3a1b-4bbd-bb5c-2da62e9bcb4d}]. Writer’s state: [VSS_WS_FAILED_AT_POST_SNAPSHOT]. Error code: [0x800423f4].]

Running VSSAdmin List Writers showed in fact that the NTDS Writer was in an Error state with [11] Failed, “Non-retryable error”.
The issue was due to a conflict with Shadow Protect, which was also doing VSS Backups. As Veeam was going to be replacing ShadowProtect, the fix for this was to remove the Shadow Protect VSS Provider:
First re-run the ShadowProtect backup which restored the NTDS Writer to a Ready State.
![]()
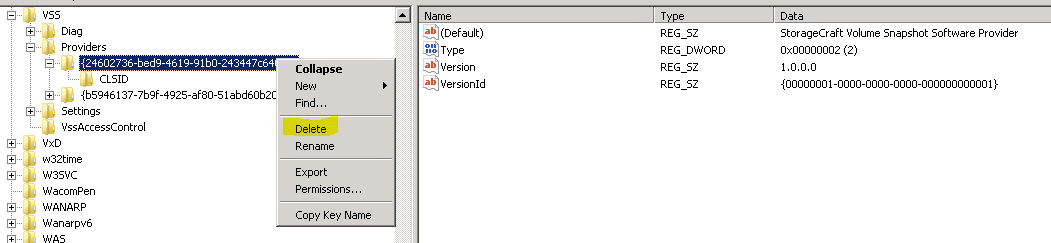
Open Regedit
Browse to HKEY_LOCAL_MACHINE\SYSTEM\CurrentControlSet\Services\VSS\Providers\
You should see the GUID {24602736-bed9-4619-91b0-243447c6409c} listed. Clicking on it shows “StorageCraft Volume Snapshot Software Provider”
![]()
Backup this registry key, then delete it.
Open Windows services and restart the “Volume Shadow Copy” service. It may be stopped to begin with, that’s okay.
Check and see if the provider is gone from: vssadmin list providers
Reboot the server when next possible.
Re-run Veeam backup and all should be successful!
Remove Exchange 2010 Archive Database from Provisioning
After creating an Archive Database in Exchange 2010, you find that Exchange will put new user mailboxes on this database, in order to balance mailboxes across stores. The easiest way to avoid this is to exclude the Archive Database from your mailbox provisioning.
Using Exchange 2010 Powershell, get a list of your mailbox databases by running Get-MailboxDatabase:
![]()
Once you confirm the name of your archive database, exclude it from automatic provisioning by running the following PowerShell command: Set-MailboxDatabase -Identity “Archive Database” -IsExcludedFromProvisioning $True
![]()